
Common Mistakes to Avoid During RCC Construction Projects
Table of Contents
Reinforced Cement Concrete (RCC) is the literal backbone of modern infrastructure. By combining the immense compressive strength of concrete with the flexible tensile strength of steel rebar, RCC allows engineers to build everything from modest family homes to soaring skyscrapers.
However, because RCC is custom-engineered and fabricated directly on a chaotic construction site rather than in a controlled factory setting, it is highly sensitive to human error. A minor misstep by a mason, a rushed timeline, or a slight deviation from engineering specifications can silently compromise a structure. This is where Project Management Consultancy (PMC) in construction plays a critical role by ensuring that every stage of RCC work is executed according to approved designs, quality standards, and project timelines. Through continuous supervision, quality checks, and coordination among stakeholders, PMC helps minimize construction errors before they become costly structural problems.
These errors manifest as micro-cracks, leaks, or deep structural faults that jeopardize safety decades down the line. For engineers, project managers, PMC professionals, and property owners alike, recognizing and preventing these common RCC construction mistakes is the single best way to ensure structural longevity.
Deviating from the Optimum Water-Cement Ratio
It is one of the most frequent sights on a job site: concrete mixes arriving slightly stiff, prompting workers to add extra water from a hose to make it easier to pour and shovel. While this high workability simplifies labor in the immediate term, it systematically destroys the concrete’s final strength.
Concrete hardens through hydration, a chemical reaction where water molecules bind permanently with cement particles. Concrete mixes are mathematically engineered to contain just enough water to catalyze this reaction.
When extra water is introduced, it cannot be chemically consumed by the cement. Instead, as the concrete cures, this excess moisture evaporates, leaving behind a network of microscopic pathways and voids.
The Strength Penalty: In concrete engineering, the relationship between water and strength is strictly inverse. Increasing the water-cement ratio by a mere 10% beyond its design parameter can drop the final compressive strength of the structural element by up to 30%, while dramatically increasing its permeability to water and chemicals.
Best Practices:
- Adhere strictly to the design mix proportions calculated by the structural engineer.
- Utilize chemical admixtures like superplasticizers to increase workability and flow in heavily reinforced sections without adding water.
- Mandate regular slump tests on-site for every batch of concrete to verify uniformity before pouring.
Neglecting the "Clear Cover" (Incorrect Spacer Blocks)
Steel reinforcement bars are exceptionally strong, but they possess a critical vulnerability: corrosion. When oxygen and moisture penetrate concrete and reach the rebar, the steel begins to rust. To prevent this, steel must be embedded deeply enough within the concrete matrix to be sealed off from the environment. The thickness of this protective concrete outer layer is known as the clear cover, making it a critical factor in rcc building construction.
When construction crews skip using cover blocks, the heavy weight of steel grids combined with workers walking over them pushes the reinforcement to the bottom or sides of the formwork. If the steel ends up sitting flush against the shuttering, it will be exposed to air the moment the molds are stripped.
When moisture hits poorly covered rebar, the resulting rust expands to up to six times the original volume of the steel. This massive internal pressure splits the concrete from the inside out—a structural failure known as spalling.
Best Practices:
- Ban the use of improvised spacers like wooden scraps, aggregate stones, or broken clay tiles, which absorb water and create localized weak points.
- Deploy manufactured, high-strength concrete or PVC cover blocks secured firmly to the rebar at 1-meter intervals.
- Check that cover depths match the specific structural element being cast to ensure durable and safe rcc building construction.
Structural Element | Minimum Required Clear Cover |
Slabs | 20 mm |
Beams | 25 mm to 30 mm |
Columns | 40 mm |
Foundations & Footings | 50 mm to 75 mm |
Inadequte or Careless Compaction
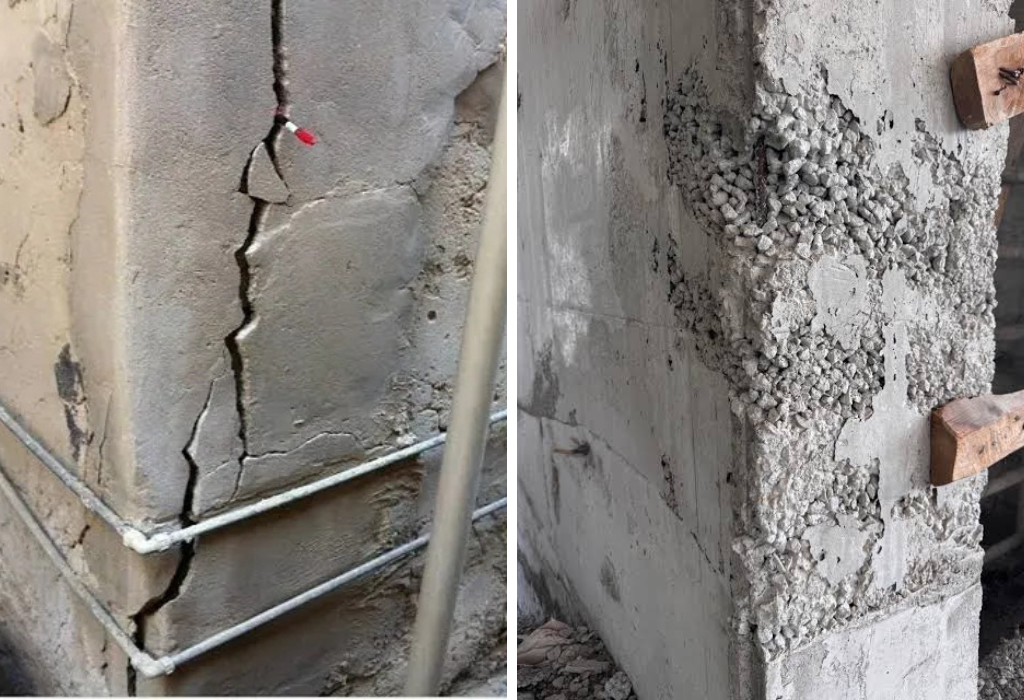
Freshly poured concrete is naturally filled with trapped air pockets. If these air voids are not systematically brought to the surface, they form localized, porous cavities that resemble a beehive. This flaw is called honeycombing, and it severely robs columns and beams of their load-bearing capacity.
Honeycombing typically stems from two operational errors: under-vibration and over-vibration. Under-vibration leaves air pockets intact, particularly around tight steel junctions. Conversely, holding a vibrator in one spot for too long causes segregation—a defect where heavy gravel drops to the bottom of the formwork while cement paste floats to the top, breaking the uniformity of the mix.
Best Practices:
- Always use mechanical needle vibrators rather than relying on manual tamping rods for structural concrete.
- Insert the vibrator needle vertically, let it vibrate for 5 to 15 seconds until the surface displays a thin, glistening sheen with no more escaping bubbles, and extract it slowly.
- Avoid touching the vibrating needle directly against the steel reinforcement bars, as this can break the delicate chemical bond forming between the steel and the adjacent partially-set concrete.
Stripping Formwork Ahead of Schedule
In commercial building projects, time directly dictates profitability. Contractors face constant pressure to remove formwork (shuttering) early so they can move the materials up to the next level. However, pulling structural supports out from under a beam or slab before it develops self-supporting strength can lead to disaster.
Concrete does not dry into its final state; it cures over a prolonged period. Removing formwork prematurely subjects a fragile, immature concrete element to tensile stresses it cannot yet handle, causing structural deflection, sag, or immediate progressive collapse.
Best Practices:
- Regard structural stripping times as absolute minimums that must be extended in cold or damp weather.
- Under ideal conditions, enforce these standard engineering timelines before dismantling supports:
- Vertical formwork (Columns, walls, outer beam faces): 16 to 24 hours
- Slab soffits (with structural props left intact directly underneath): 3 days
- Beam soffits (with structural props left intact directly underneath): 7 days
- Removal of slab props (for spans up to 4.5 meters): 7 days
- Removal of beam props (for spans exceeding 6 meters): 21 days
Poor Curing Practices
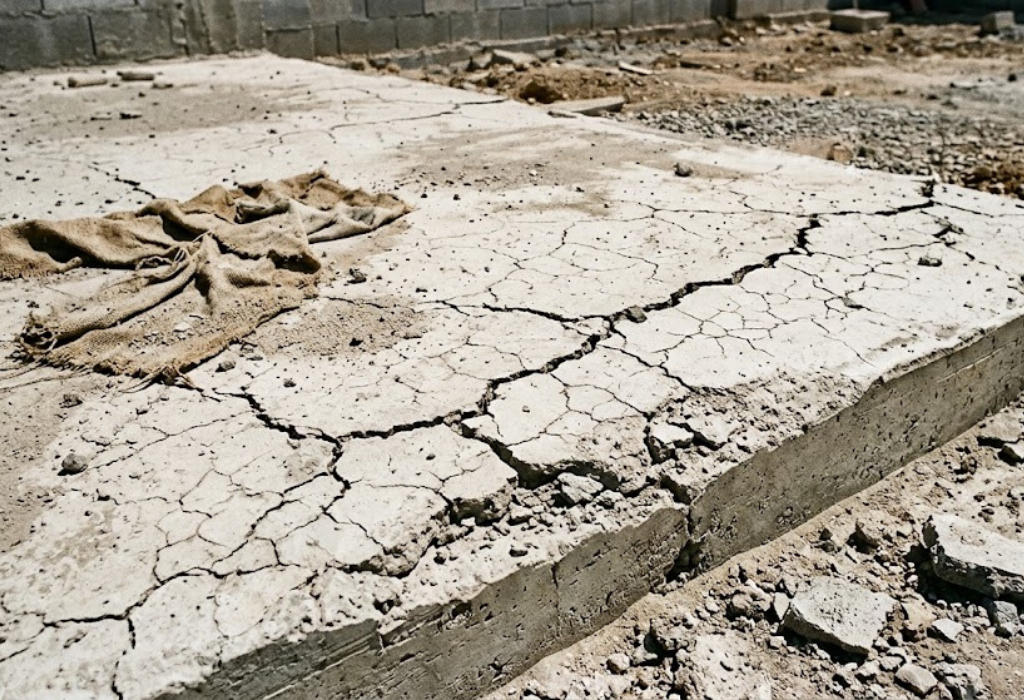
Pouring the concrete is only half the battle. Once concrete undergoes its initial set, it requires a continuous presence of moisture to sustain the chemical process of hydration over its first few weeks. This process of moisture preservation is called curing.
If concrete surfaces are left unprotected and dry out rapidly from sun exposure or high winds, the hydration process halts abruptly. The concrete’s surface becomes brittle, dusty, and plagued by a spiderweb of plastic shrinkage cracks.
Best Practices:
- Initiate curing operations the moment the concrete surface loses its initial wet sheen and is firm enough to resist indentation.
- Maintain a wet environment continuously for a minimum of 7 to 10 days (extending to 14 days for environments with high wind or low humidity).
- Tailor curing strategies to the geometry of the component: use ponding (creating small water dams) on horizontal slabs, and wrap vertical columns in wet burlap or gunny bags to hold moisture against the surface.
Incorrect Reinforcement Detailing and Careless Lapping
Because steel rebars are manufactured in standard lengths (usually 12 meters), bars must be joined together on-site to span longer structural elements. This joinery is achieved by overlapping the bars over a specific distance, creating a lap splice.
A critical and incredibly common detailing error is executing all rebar laps along the exact same vertical or horizontal plane. If a structural element is subjected to heavy bending or tensile stress, a uniform line of joints acts like a perforation, allowing the concrete to split open. Furthermore, if the overlap length is cut too short, stress cannot successfully transfer from one steel bar to the next.
Best Practices:
- Stagger all lap joints: Ensure that no more than 50% of structural bars are lapped at any single cross-section of a beam or column.
- Always enforce the precise lap length dictated by the structural drawings, which is calculated as a multiple of the bar’s diameter.
- Never position a lap splice within high-stress zones, such as the exact center of a beam’s span or right at a critical beam-column intersection.
Elevating Quality Control on Site
The structural issues discussed above are largely avoidable. They are rarely the result of inherent material defects; instead, they typically arise from inadequate supervision, accelerated construction schedules, and insufficient training of on-site workers.
A reinforced concrete (RCC) frame functions as an integrated structural system, where the overall strength and safety depend on the quality of every connection and construction practice. Through diligent supervision, the correct use of cover blocks, adherence to proper curing durations, and controlled water usage during construction, long-term structural performance can be significantly improved. At dhinwa construction, attention to these critical details helps safeguard your investment while ensuring the safety, durability, and reliability of the building for generations to come.